http://glindba.com/2011/11/27/how-to-configure-and-add-new-san-disks-to-the-existing-sql-server-2008-r2-cluster/
How to configure and add new SAN disks to the existing SQL Server 2008 R2 cluster
The demo environment intruduction:
It’s a two nodes Windows Server 2008 R2 cluster running two SQL Server virtual servers. One is SQL Server 2008 R2(MySQLVS2) with default instance. Another is SQL Server Denali CTP3 (MySQLVS3) with a named instance called SQLDENALICTP3.Four new SAN disks(LUNs) have been attached to both nodes(SQLNode2 and SQLNode3).
This post shows how to configure these 4 disks and add them to the exising production SQL Server 2008 cluster group for creating new databases.
Let’s get started:
Step 1: log on to the first node(SQLNode2) and start the Windows command line tool DISKPART as Administrator.
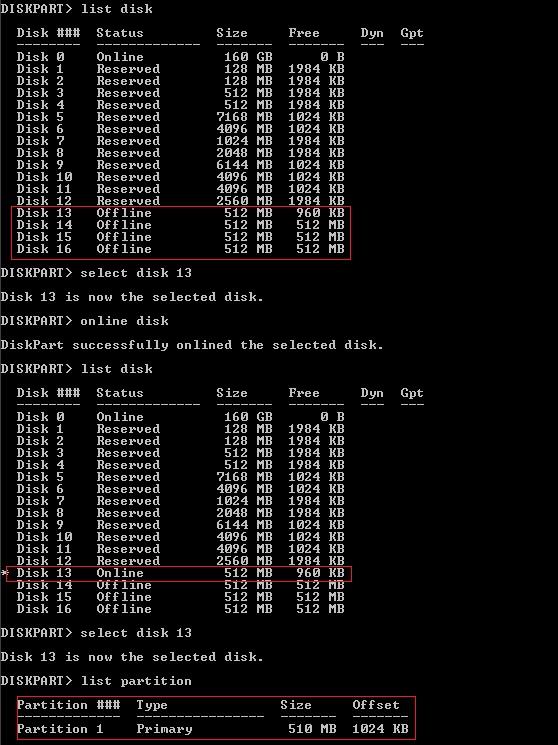
First run list disk command in DISKPART environment to verify all four disks(Disk 13/14/15/16) are available.
Then bring the first disk “Disk 13″ online by running:
select disk 13
online disk
See below screenshot for details:

Step 2: Create partition on “Disk 13″
First select disk 13 and run list partion to confirm there are no partitions on this disk.
To create partition, the disk can not be read-only. Use attributes disk to verify and use attributes disk clear readonly to make the disk configurable.
Now create a primary partition on the disk with the offset(align)=1024K which is the best practice for most SAN configuration in terms of optimal disk I/O performance. The default value is 64K (I tested in this demo environment) in Windows Server 2008 R2, 1024K(didn’t test it) in Windows Server 2008 and 31.5KB (63 x 512byte disk sectors) in Windows Server 2003 and previous.A right offset setting can align nicely with the common RAID stripe sizes of 64K or 128K, or the optimal NTFS allocation unit size of 64KB. A wrong offset setting(like 31.5K, the default value in Windows Server 2003) can lead to a big performance drop as requesting more disk I/O operations for the same amount data volume every so often. It cannot be fixed without redoing the partition which most time is not acceptable in production. Check this for more details about “Disk Partition Alignment”
create partition primary align=1024
See below for details:

Step 3: Format the partition and assign a drive letter:
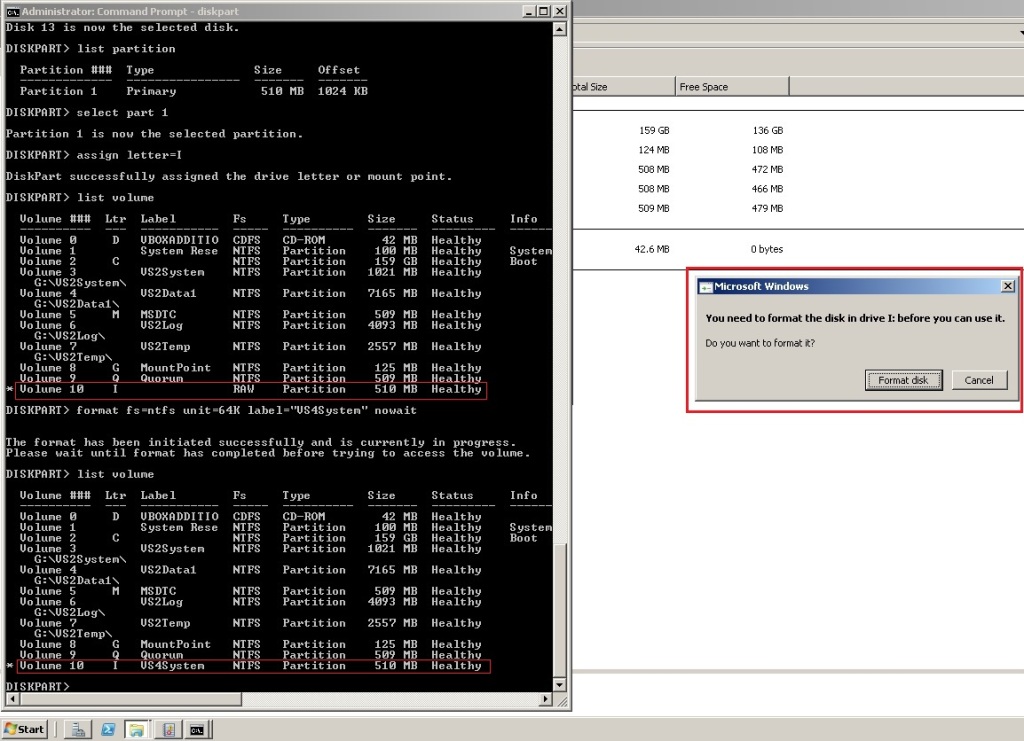
First select the partition (partition 1) to assign a drive letter. Windos Server will pop up a window(see below right side in the red box) to prompt you to format the disk. Click on Cancel to get rid of it because we want to use diskpart to format the partion.
list volume to verify the letter was assigned correctly and run the following command to format the partion:
format fs=ntfs unit=64K label=”VS4System” nowait
The value of “unit” is the allocation unit size, a.k.a cluster size, and 64K is the best for SQL Server in most case.
Step 4: Go to another node (SQLNode3) and try to do the same on the same disk(Disk 13). This step is optional.
First list disk to make sure those 4 disks are also availabe on this node and then online disk 13.
select disk 13 and list parttion to verify the partion already exists.
list volume turned out a “wrong” drive letter E was assigned to the partition(Volume 9 here). Run remove letter= E followed by assign letter= I to correct this.
Again this step is optional.
Below is the detail:
Step 5: Come back to the first node (SQLNode2) and Create 3 folder under I:\
mkdir VS4Data
mkdir VS4Log
mkdir VS2Temp
Step 6: Create partion on Disk 14
Follow the same procudures as Step 2 and Step3. The only difference is instead of a letter, a mount point(I:\VS4Log) was assigned to the volume
select disk 14
online disk
attributes disk clear readonly
create partition primary align=1024
assign mount=I:\VS4Log
format fs=ntfs unit=64K label=”VS4Log” nowait
See below for the details:
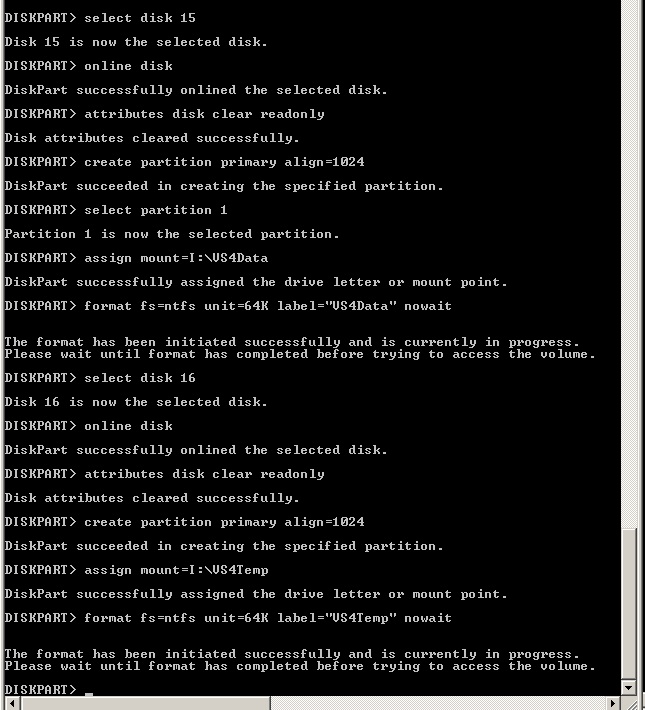
Step 7: Create partition on Disk 15 and Disk 16
Pretty much the same as the last step.
select disk 15
online disk
attributes disk clear readonly
create partition primary align=1024
assign mount=I:\VS4Data
format fs=ntfs unit=64K label=”VS4Data” nowait
select disk 16
online disk
attributes disk clear readonly
create partition primary align=1024
assign mount=I:\VS4Temp
format fs=ntfs unit=64K label=”VS4Temp” nowait
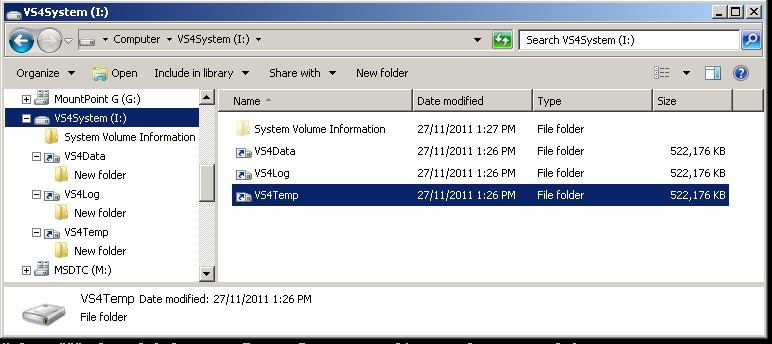
Step 8: Verify the disks are usable by creating a folder under each of the mount points in Windows Exporer :
This step is optional, but do it for the best practice.
Step 9: Add disks to the Windows cluster
First start Failover Cluster Manager (one fo the Administrative Tools in Windows Server 2008 R2).
Expand the Windows cluster(here is wincluster.gnet.local),
then right click on Storage,
select “Add a disk”.
In “Add Disks to a Cluster” popup window, only select “Disk 13″ and then click OK.
We configure “Disk 13″ first as the other disks are mounted under it(drive letter I). If we do all four disks togather, Window will assign some different letters to Disk 14/15/16 because the drive letter I is not avilable yet. To save the trouble of removing “wrong” drive letters, we better do “Disk 13″ first.
Step 10: verify the “Disk 13″ has been added to the cluster in “Available Storage” group and the driver letter I was correctly assigned to it.
Step 11: continue adding the rest 3 disks to the cluster
Step 12: verify all these 3 disks have been added to the cluster in “Available Storage” group and the mount points were assigned as expected.
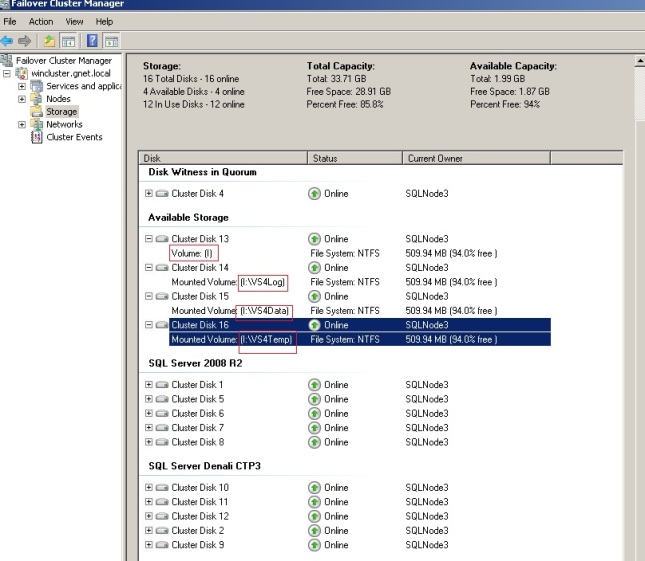
Step 13: Add a new cluster group for testing the new clustered disks.
To failover the disks between the nodes, we need to add them to a service group. Since we cannot use the production cluster groups. so we create a new temparary one.
In “Failover Cluster Manager”, expand cluster(here is wincluster.gnet.local),right click on “Service and applications”, click on “More Actions”, click on “Create Empty Service or Application”
See below for details:
Step 14: Change the defualt name “New service or application” to “Temp Storage Group”
Step 15: Add all four new disks to “Temp Storage Group”
In “Failover Cluster Manager”, expand cluster(here is wincluster.gnet.local), expand “Service and applications”, right click on “Temp Storage Group”, click on “Add Storage”, in “Add Storage” popup window, select all 4 disks and click OK.
Step 16: Test failover
In “Failover Cluster Manager”, expand cluster(here is wincluster.gnet.local), click on “Service and applications”, right click on “Temp Storage Group”, click on “Move this service or application to another node”, click on “1-move to node SQLNode2″
Step 17: Configue dependency
Since the mount points for Disk 14,Disk 15 and Disk 16 were created under Disk 13 (drive letter I), we have to enforce this relationship in the cluster through dependency.
In “Temp Storage Group”, right click on “Disk 14″, click on “Properties”, in “Cluster Disk 14 Properties” window, click on the tab “dependencies”, click on “Insert”, in the “Resource” drop down list, select “Disk 13″, then click OK.
Do the same for “Disk 15″ and “Disk 16″.
After configuring the denpendencies, test it by taking ”Disk 13″ offline(all other 3 disks should go offline as well). Test to bring “Disk 14″ online, Windows cluster automatically bring “Disk 13″ online first.
Step 18: move the four new disks to “SQL Server 2008 R2″ group.
In “Temp Storage Group”, right click on “Disk 13″, click on “Move Actions”, click on the tab “Move this resource to another service or application”, in ”Select A Service or Application” popup window, select “SQL Server 2008 R2″, then click OK.
Step 19: verify all 4 new disks are now in “SQL Server 2008 R2″ group

Step 20: Add “Disk 13/14/15/16″ to “SQL Server” dependency
In “Failover Cluster Manager”, expand cluster(here is wincluster.gnet.local), click on “Service and applications”, right click on “SQL Server” in “Other Resource” group, click on “Properties”, in “SQL Server Properties” window, click on the tab “dependencies”, click on “Insert”, in the “Resource” drop down list, select “Disk 13″, click ”Insert” again to add “Disk 14″. Do the same for “Disk 15/16″ , then click OK.
Step 21: Create a new database using SSMS to use the new disks.
This should be very straight forward.
Step 22: Double check.
By following the steps above, we have completely and successfully finished the job, but good DBA’s alway verify everything having been done right. So let’s double check. First confirm the partition alignment/offset on the new disks is correct by running this command:
wmic partition get name, index, startingoffset, blocksize
below is the output:
Run this command to confirm the allocation unit(cluster) size is 64K
fsutil fsinfo ntfsinfo I:
fsutil fsinfo ntfsinfo I:\vs4data
fsutil fsinfo ntfsinfo I:\vs4data
fsutil fsinfo ntfsinfo I:\vs4temp
below is the output:
Everythis is looking good. We did a great job :=)
Summary:
Adding new SAN disks to the existing production clusters could be a tricky tasks as any wrong moves can take the live production SQL Server instance offline. By fully understanding the risk and following the correct procedures, a DBA can feel more comfortable when doing this kind of job.
'Brain Trainning > DataBase' 카테고리의 다른 글
| [MSSQL] Benchmarking SQL Server IO with SQLIO (펌) (0) | 2011.12.27 |
|---|---|
| [MSSQL] Sql Server 2008 SP3 링크 (0) | 2011.12.26 |
| [Oracle] Export & Import Oracle Dump (0) | 2011.11.26 |
| [MongoDB] MySQL 쿼리를 MongoDB 로 ... (0) | 2011.11.23 |
| [MSSQL] SQL Server High Availability Options (펌) (0) | 2011.10.26 |

 How to configure and add new SAN disks to the existing SQL .pdf