블로그 이미지
LifeisSimple

calendar

1 2 3 4 5 6
7 8 9 10 11 12 13
14 15 16 17 18 19 20
21 22 23 24 25 26 27
28 29 30

Notice

2010. 9. 29. 11:09 Brain Trainning/DataBase

MySQL Clustering Config

Posted October 6, 2008
Filed under:
 Uncategorized | Tags: cluster, Clustering, MySQL |

I’ve had two positive comments to my previous post so I figured it was time to write an update regarding how my work has been going.

The MySQL clustered database is part of a large project I’ve been working on for the last 2 months. The basic server setup is two clustered JBoss 4.2.3Application Servers running on top of two clustered MySQL 5.0.67 servers. There is a 3rd Server which is a backup which currently only runs the MySQL manager ment console. I’ve noticed that even if there is high load on the 2 NDB data nodes, the Management console does not do much.

The four main servers run 2 Dual-Core AMD Opteron(tm) Processors with 8 gig of ram.

Even though alot of my work has been to rework my own code in order to optimize and improve it, alot of time has been spent looking for a configuration for the MySQL cluster that would cope with the load as I found that it was quite easy to kill the cluster in the beginning.

The config I am currently using is below and following are some results of the load testing I’ve been doing.

[TCP DEFAULT]

SendBufferMemory=2M

ReceiveBufferMemory=2M


[NDBD DEFAULT]

NoOfReplicas=2


# Avoid using the swap

LockPagesInMainMemory=1


#DataMemory (memory for records and ordered indexes)

DataMemory=3072M


#IndexMemory (memory for Primary key hash index and unique hash index)

IndexMemory=384M


#Redolog

# (2*DataMemory)/64MB which is the LogFileSize for 5.0

NoOfFragmentLogFiles=96


#RedoBuffer of 32M. If you get "out of redobuffer" then you can increase it but it

#more likely a result of slow disks.

RedoBuffer=32M


MaxNoOfTables=4096

MaxNoOfAttributes=24756

MaxNoOfOrderedIndexes=2048

MaxNoOfUniqueHashIndexes=512


MaxNoOfConcurrentOperations=1000000


TimeBetweenGlobalCheckpoints=1000


#the default value for TimeBetweenLocalCheckpoints is very good

TimeBetweenLocalCheckpoints=20


# The default of 1200 was too low for initial tests. But the code has been improved alot

# so 12000 may be too high now.

TransactionDeadlockDetectionTimeout=12000

DataDir=/var/lib/mysql-cluster

BackupDataDir=/var/lib/mysql-cluster/backup


[MYSQLD DEFAULT]


[NDB_MGMD DEFAULT]


# Section for the cluster management node

[NDB_MGMD]

# IP address of the management node (this system)

HostName=10.30.28.10


# Section for the storage nodes

[NDBD]

# IP address of the first storage node

HostName=10.30.28.11


[NDBD]

# IP address of the second storage node

HostName=10.30.28.12


# one [MYSQLD] per storage node

[MYSQLD]

[MYSQLD]


Here are some numbers of what I’ve been able to get out of the MySQL cluster. One iteration of my code results in:
12 selects
10 inserts
10 updates
4 deletes
This might sound like a lot, but it is a service oriented application that relies on persistent JBoss queues and demands
 100% redundancy so even if the server dies, it will pickup where it died and does not loose any data.

My first benchmark was 10 000 iterations which is the current load I can expect on the application over the course of an hour i.e.
12 000 selects
10 000 inserts
10 000 updates
4 000 deletes
This took a total of
 93 seconds producing just over 100 iterations per second.

The second test to really put the application and environment to the test was to run 100 000 iterations. This test completed in roughly 15 minutes producing around 110 iterations per second. This is about 10x the load we’d expect to see during the course of one hour but it is nice to see the setup has the ability to grow quite a bit before we need more hardware. :)

I am currently working on setting up a third test which will run 100 000 iterations every hour for 10 hours producing 1 millions rows of data.


Possibly related posts: (automatically generated)

·         I’m half way to being MySQL certified

·         Oracle buying Sun, therefore adquiring MySQL!!!!!

·         Tips & Tricks from MySQL Experts


 출처 : http://bieg.wordpress.com/2008/10/06/mysql-clustering-config/

'Brain Trainning > DataBase' 카테고리의 다른 글

SQL Diag 이렇게 이용  (0) 2010.10.16
SQL Server 2008 SP2 (서비스팩2)  (0) 2010.10.04
MySQL Clustering on Ubuntu  (0) 2010.09.29
MySQL Cluster 구성  (0) 2010.09.20
유지관리 - 흔적삭제  (0) 2010.09.13
posted by LifeisSimple
2010. 9. 29. 10:56 Brain Trainning/DataBase

MySQL Clustering on Ubuntu

Posted August 3, 2008
Filed under:
 Clustering, MySQL, Uncategorized |

I spent some time getting MySQL clustering working with Ubuntu after reading a guide on Howto Forge. The guide however went into the details of compiling and installing MySQL from source so I’m creating this to show the steps needed to get it set up on a fresh Ubuntu installation.

For a correct setup you will need 3 machines. The first machine will serve as the management node, and the other two will be storage nodes.

At the time of writing, the current stable version of Ubuntu is 8.04.1 and the MySQL version that is installed is 5.0.51

During the configuration I log onto the machines and use the command

sudo su -

to gain permanent root access and saving myself from having to type sudo in front of every command. Use your own discretion.

Installing MySQL

Using apt this is straight forward. Just type the following command on all three machines to install MySQL server.

apt-get install mysql-server

Once asked to, set the root password to the MySQL database. You’ll need to remember this one. Once MySQL server is installed we’ll proceed to configure the management node.

Configuring the Management Node

Create and edit the file /etc/mysql/ndb_mgmd.cnf. Copy and paste the text bellow changing the ip addresses to match your setup as necessary.

[NDBD DEFAULT]

NoOfReplicas=2

DataMemory=80M    # How much memory to allocate for data storage

IndexMemory=18M   # How much memory to allocate for index storage

# For DataMemory and IndexMemory, we have used the

# default values. Since the "world" database takes up

# only about 500KB, this should be more than enough for

# this example Cluster setup.

[MYSQLD DEFAULT]

[NDB_MGMD DEFAULT]

[TCP DEFAULT]

# Section for the cluster management node

[NDB_MGMD]

# IP address of the management node (this system)

HostName=192.168.1.5


# Section for the storage nodes

[NDBD]

# IP address of the first storage node

HostName=192.168.1.6

DataDir=/var/lib/mysql-cluster

BackupDataDir=/var/lib/mysql-cluster/backup

DataMemory=512M

[NDBD]

# IP address of the second storage node

HostName=192.168.1.7

DataDir=/var/lib/mysql-cluster

BackupDataDir=/var/lib/mysql-cluster/backup

DataMemory=512M


# one [MYSQLD] per storage node

[MYSQLD]

[MYSQLD]

Configuring the Storage Nodes

As you can see in the file we created in the previous step, the cluster will be using/var/lib/mysql-cluster on the storage machines. This path is created when you install MySQL server but they are owned by root. We want to create the backup directory and change ownership to mysql.

mkdir /var/lib/mysql-cluster/backup

chown -R mysql:mysql /var/lib/mysql-cluster

Now we’ll need to edit the MySQL configuration so that the storage nodes will communicate with the Management Node.

Edit /etc/mysql/my.cnf

Search for [mysqld] and add the following.

[mysqld]

ndbcluster

# IP address of the cluster management node

ndb-connectstring=192.168.1.5

Then scroll down to the bottom until you see [MYSQL_CLUSTER]. Uncomment the line and edit so it looks like

[MYSQL_CLUSTER]

ndb-connectstring=192.168.1.5

The reason the connect string it found twice in the mysql file is because one is used by mysql server, and the other is used by the ndb data node app. Save the changes to the file.

Make sure you complete the changes on both data nodes.

Start the Management Node

Start the Management Node using

/etc/init.d/mysql-ndb-mgm restart

The process shouldn’t be running but using restart doesnt hurt. Once it is started we can access the management console using the command ndb_mgm. At the prompt type show; and you will see

ndb_mgm> show;

Connected to Management Server at: localhost:1186

Cluster Configuration

---------------------

[ndbd(NDB)]    2 node(s)

id=2 (not connected, accepting connect from 192.168.1.6)

id=3 (not connected, accepting connect from 192.168.1.7)


[ndb_mgmd(MGM)]    1 node(s)

id=1    @192.168.1.5  (Version: 5.0.51)


[mysqld(API)]    2 node(s)

id=4 (not connected, accepting connect from any host)

id=5 (not connected, accepting connect from any host)

As you can see the management node is waiting for connections from the data nodes.

Start the Data Nodes

On the data nodes, issue the commands

/etc/init.d/mysql restart

/etc/init.d/mysql-ndb restart

Go back to the management node, type show; again, and now you should see something similar to

id=2    @192.168.1.6  (Version: 5.0.51, starting, Nodegroup: 0)

id=3    @192.168.1.7  (Version: 5.0.51, starting, Nodegroup: 0)

Once they have started properly, the show command should display

ndb_mgm> show;

Cluster Configuration

---------------------

[ndbd(NDB)]    2 node(s)

id=2    @192.168.1.6  (Version: 5.0.51, Nodegroup: 0, Master)

id=3    @192.168.1.7  (Version: 5.0.51, Nodegroup: 0)

[ndb_mgmd(MGM)]    1 node(s)

id=1    @192.168.1.5  (Version: 5.0.51)

[mysqld(API)]    2 node(s)

id=4    @192.168.1.7  (Version: 5.0.51)

id=5    @192.168.1.6  (Version: 5.0.51)

Congratulations, your cluster is now setup.

Testing the cluster

Issue the following on both data nodes to create the test database. Since clustering is done on a table basis in MySQL we have to create the database manually on both data nodes.

$> mysql -u root -p

Enter password:

Welcome to the MySQL monitor.  Commands end with ; or \g.

Your MySQL connection id is 8

Server version: 5.0.51a-3ubuntu5.1 (Ubuntu)


Type 'help;' or '\h' for help. Type '\c' to clear the buffer.


mysql> create database clustertest;

Query OK, 1 row affected (0.00 sec)

Once this i done, on ONE of the data nodes, create a test table and add an entry.

mysql> use clustertest;

Database changed

mysql> create table test (i int) engine=ndbcluster;

Query OK, 0 rows affected (0.71 sec)


mysql> insert into test values (1);

Query OK, 1 row affected (0.05 sec)


mysql> select * from test;

+------+

| i    |

+------+

|    1 |

+------+

1 row in set (0.03 sec)

We’ve just created a table test, added a value to this table and made sure that the table contains one entry. Note that engine=ndbcluster must be used to let MySQL know that this table should be clustered among the data nodes. Let’s make sure that the table is infact created on the other data node, and contains one entry.

mysql> use clustertest;

Reading table information for completion of table and column names

You can turn off this feature to get a quicker startup with -A


Database changed

mysql> show tables;

+-----------------------+

| Tables_in_clustertest |

+-----------------------+

| test                  |

+-----------------------+

1 row in set (0.01 sec)


mysql> select * from test;

+------+

| i    |

+------+

|    1 |

+------+

1 row in set (0.04 sec)

As you can see, the cluster is working.

Moving an existing database to the cluster

Now that we have the cluster working, we can easily change an existing database to be clustered. All you need to do is run the following command on each of the tables.

alter table my_test_table engine=ndbcluster;

The table, and all it’s data will be copied to the datanodes and you can now access/change then through any nodes in the cluster. Very simple.


Possibly related posts: (automatically generated)

·         How to fix forgotten MySql passwords in Ubuntu

·         How to set or reset password mysql on Ubuntu

·         Ebooks on MySQL


'Brain Trainning > DataBase' 카테고리의 다른 글

SQL Server 2008 SP2 (서비스팩2)  (0) 2010.10.04
MySQL Clustering Config  (0) 2010.09.29
MySQL Cluster 구성  (0) 2010.09.20
유지관리 - 흔적삭제  (0) 2010.09.13
Brad M. McGehee SQL Presentations  (0) 2010.09.08
posted by LifeisSimple
2010. 9. 29. 10:27 Brain Trainning/Server

황당한 경험 VMWare에서 Ubuntu 를 Guest 설치하게 될 경우 X에서 키보드가 먹지 않는 문제가 발생했다.

어떤 방법으로도 해결이 어려워 결국은 다른 Server 를 재설치 했으나 동일... 


해결 방법은 역시 녹색창에 검색어 


다음과 같이 해결하면 됩니다. 


----------------------------  인용 본문 (이미지등은 웬지) -------------------------------------------------------

**** 요건 Kor 에서 ****

 최근 다시 우분투 10.4 를 VMware 에 깔아보니 키보드 문제가 생긴다는 점을 새롭게 발견했다. 이의 간단한 해결책 및 간단히 우분투 10.04 를 가상 머신으로 설치하는 방법에 대해서 포스팅을 작성한다.


 준비물 : VMware player 3.0.1, ubuntu 10.04 32bit (모두 무료 버전임)


 일단 WMware 를 구동시키기고 Create a New Virtual Machine 을 클릭하자.


**** 요건 외쿡에서 ****

I decided to download the Kubuntu Lucid 10.04 Release Candidate and take it for a test drive today. As usual, I installed it into a WMWare Workstation 7.0 virtual machine. The install went very smoothly, but when it came to login time the keyboard didn’t produce any characters in the login box. The mouse worked fine, but no keyboard.

Being a clever fellow, I opted for a console login which worked fine. I then executed “startx” from the console and the GUI started right up. It seemed to work fine in general, but still no keyboard. Tried playing with the keyboard settings in System Settings, but it didn’t fix the problem. Hmmm.

Searching the web, I found the answer on VMWare’s forum. User SGiff wrote, in part:

I found the :0-greeter.log file in /var/log/gdm had errors complaining about not find symbols for “U.S. English” keyboard layout in us keyboard file. A little grepping later finds “U.S. English” is set in /etc/default/console-setup.
<from original file>
XKBMODEL=”SKIP”
XKBLAYOUT=”us”
XKBVARIANT=”U.S. English”
XKBOPTIONS=”"

<changed to this, matching other linux installs>
XKBMODEL=”pc105″
XKBLAYOUT=”us”
XKBVARIANT=”"
XKBOPTIONS=”"

Reboot and keyboard now works at login.

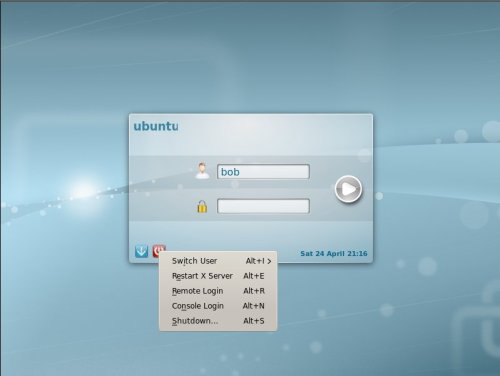
And indeed it did. To login to the console, left click on the red “Shutdown” icon, then select “Console Login” from the drop down menu:

After logging into the console, type at the prompt:

cd /etc/default
sudo nano console-setup

Find the offending settings which SGiff pointed out towards the end of the file, make the recommended changes, save the file, then type “sudo reboot” at the console prompt. The system restarts. When the GUI login comes up, everything should work fine. It does here.

Bottom line is that, per VMWare, Workstation 7.0.1 isn’t yet compatible with Lucid. The elimination of Hal from Lucid probably has something to do with this problem. However, everything else, including VMWare Tools, works just fine.

Hope that this helps someone. Many thanks to SGiff!

posted by LifeisSimple
prev 1 next