블로그 이미지
LifeisSimple

calendar

1 2 3 4
5 6 7 8 9 10 11
12 13 14 15 16 17 18
19 20 21 22 23 24 25
26 27 28 29 30 31

Notice

2010. 12. 2. 19:00 Brain Trainning/DataBase
출처 : http://www.sqlservercentral.com/articles/Integration+Services+(SSIS)/61714/

Set Up And Schedule a Server Side Trace

By Grant Fritchey, 2010/12/02

Total article views: 542 | Views in the last 30 days: 542

One of the best ways to collect performance metrics on queries and stored procedures is to use the trace events defined by the Profiler software that comes free with SQL Server. However, running the Profiler GUI directly against production systems is not generally considered a good idea (for more details, read this article). Instead, you should set up a scripted trace, what is usually referred to as a server side trace. The server side trace uses T-SQL statements to define all the trace elements, but if you're not familiar with all the commands and structure needed to put this together, it can be a bit daunting. Don't worry, the Profiler tool comes with a mechanism to generate the scripts needed for a server side trace.

First, open Profiler, connect to a development server or some other non-production server, create a new trace, and define the events, columns, and other properties you would like to capture (here's a great article on how to do that). With the trace defined, click the on the definition window in Profiler and then immediately click the Stop button on the toolbar. You should now have a defined, but stopped trace. Now click on the File menu, then the Export menu choice and then the Script Trace Definition menu choice. From there you can generate a script for various purposes and versions of SQL Server. For this example select For SQL Server 2005 - 2008 R2 menu choice. This will just open a file save window. Select a location for the script, save it.

We're done with Profiler so you can close it.

In SQL Server Management Studio you can open the T-SQL script that you just created. This script is not specific to the server you created it on. It's simply reflects the choices you made with Profiler. The main points that concern us in this script are the beginning of the script. Assuming you used defaults, the first few lines of the script generated will look like this:

/****************************************************/
/* Created by: SQL Server 2008 R2 Profiler */
/* Date: 10/30/2010 01:18:55 PM */
/****************************************************/
-- Create a Queue
declare @rc int
declare @TraceID int
declare @maxfilesize bigint
set @maxfilesize = 5
-- Please replace the text InsertFileNameHere, with an appropriate
-- filename prefixed by a path, e.g., c:\MyFolder\MyTrace. The .trc extension
-- will be appended to the filename automatically. If you are writing from
-- remote server to local drive, please use UNC path and make sure server has
-- write access to your network share
exec @rc = sp_trace_create @TraceID output, 0, N'InsertFileNameHere', @maxfilesize, NULL 
if (@rc != 0) goto error

This is where you can take control of the server side trace. The variables defined are mostly used within the query and you don't need to worry about them. The one of interest here is the @maxfilesize parameter. This will define how big the output file for the server side trace will be, in megabytes. You can set this to what seems appropriate to your system. Further, you may want to collect multiple files using the rollover option. Rollover will basically let the trace continue, but when the max file size is reached, it starts a new file. I recommend using this option so that you can collect a lot of trace data, but still access it as it gets collected. You can get to the file after the files roll over because the active file will be locked by the trace. For now I'll leave that as the default.

The comments immediately after the variable declarations tells you what to do to define a file storage location for this trace. You can use a network location, just be sure that the security context that SQL Server runs under can access that location. For the example, I'll change this to a share on my machine:

exec @rc = sp_trace_create @TraceID output, 0, N'\\mymachine\myshare\mytrace', @maxfilesize, NULL

As the comments tell you, the .trc extension will be automatically added.

From here, you can run this script, as is, on your production system and you will have a server side trace collecting data and outputting it to the file you defined. But, don't run it yet. We still need to define the rollover option. There are multiple options that can be defined for a trace, but I'll leave that for you to read in the Books Online. The one option we need to enable rollover has a value of 2. So now the script is modified as follows

exec @rc = sp_trace_create @TraceID output, 2, N'\\mymachine\myshare\mytrace', @maxfilesize, NULL

Note the change of the value from 0 to 2. Now, when this trace runs, you will get a new file every time the file size hits 5mb. You could run this script now, but there's still a problem. How do you stop it?

You have two options. You can simply start the trace and then use fn_trace_getinfo to retrieve the ID of the trace from SQL Server and then run sp_trace_setstatus to stop the trace and deallocate it. However, that's a lot of work. And, in most circumstances you only want to run the trace for a limited amount of time. Luckily, there's another option on sp_trace_create, stoptime. This defines a date and time to stop the query. Since our purpose is to automate the execution of this script, we can't simply type in the date and time we want it to stop. Instead we need to automate it. For the example here, I'll make it so it will stop one hour after it starts, regardless of start time. Here's the modification to the script:

DECLARE @stoptime DATETIME = DATEADD(hour,1,GETDATE())
exec @rc = sp_trace_create @TraceID output, 2, N'\\mymachine\myshare\mytrace ', @maxfilesize, @stoptime

I've created a variable, @stoptime, as a DATETIME data type. I've set the value of the variable using DATEADD to add one hour to the current date and time. Then, the sp_trace_create call was modified, changing the final NULL to the new variable, @stoptime. This will automatically stop the trace after one hour.

Now we're ready to execute the script. But, if you want to automate it, you can take advantage of SQL Agent. Just save the file to a location accessible from the server where you intend to automate the trace. Open Agent and add a new Job. Create a new Step. On the Step definition page, you can define the step as being a T-SQL Script. Then, click the Open button. Select the script you've been working on, and you will see it opened in the script window, looking something like you see below:


Create a schedule to run the job, or run it on demand and you'll have a server-side trace collecting the events you defined out to a file that will rollover as needed and automatically stop. This is everything you need to get started on automatically collecting performance metrics on your systems in an automated fashion.

posted by LifeisSimple
2010. 11. 29. 12:06 Brain Trainning/DataBase
출처 : http://www.mssqltips.com/tip.asp?tip=1771

Splitting Delimited Strings Using XML in SQL Server

Written By: Divya Agrawal -- 6/12/2009 -- read/post comments -- print -- Bookmark and Share 

Rating: (not rated yet) Rate 

Problem
This article will help developers looking for a way to split delimited strings in a single query using XML. We generally use a user defined function to do this, which you have probably found in many places that splits the string based on the delimiter passed. But, when it comes to separating the string in a single query without any help of a user defined function there are not many options. I have found a much simpler and shorter way of splitting any string based on a delimiter. I will be using the power of XML to do the splitting of the string instead of a user defined function.

Solution
Let's say for example there is a string 'A,B,C,D,E' and I want to split it based on the delimiter ','.

The first step would be to convert that string into XML and replace the delimiter with some start and end XML tags.

DECLARE @xml as xml,@str as varchar(100),@delimiter as varchar(10)
SET @str='A,B,C,D,E'
SET @delimiter =','
SET @xml = cast(('<X>'+replace(@str,@delimiter ,'</X><X>')+'</X>') as xml)
SELECT @xml

Here is what this looks like after the delimiter ',' is replaced by </X><X> tags. When you see the output after converting the string into XML, you will be able to see the string as shown in the image below:

Once the string is converted into XML you can easily query that using XQuery

DECLARE @xml as xml,@str as varchar(100),@delimiter as varchar(10)
SET @str='A,B,C,D,E'
SET @delimiter =','
SET @xml = cast(('<X>'+replace(@str,@delimiter ,'</X><X>')+'</X>') as xml)
SELECT N.value('.', 'varchar(10)') as value FROM @xml.nodes('X') as T(N)

.This will give the output as a separated string as:

Now, say I have a table that has an ID column and comma separated string data as shown below.

DECLARE @t TABLE( ID INT IDENTITY, data VARCHAR(50))
INSERT INTO @t(data) SELECT 'AA,AB,AC,AD'
INSERT INTO @t(data) SELECT 'BA,BB,BC'
SELECT * FROM @t

I can use the method shown above to split the string.

DECLARE @t TABLE( ID INT IDENTITY, data VARCHAR(50))
INSERT INTO @t(data) SELECT 'AA,AB,AC,AD'
INSERT INTO @t(data) SELECT 'BA,BB,BC'
SELECT F1.id,
 F1.data,
 O.splitdata 
FROM
 (
 SELECT *,
 cast('<X>'+replace(F.data,',','</X><X>')+'</X>' as XML) as xmlfilter from @t F
 )F1
 CROSS APPLY
 ( 
 SELECT fdata.D.value('.','varchar(50)') as splitdata 
 FROM f1.xmlfilter.nodes('X') as fdata(D)) O

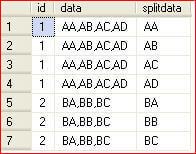
When the above is run this is the output we get:

This is what is being done. First of all I cast the 'data' column of table @t into an XML data type by replacing the delimiter with starting and ending tags '<X></X>'.

I have used 'CROSS APPLY' for splitting the data. The APPLY clause lets you join a table to a table-valued-function. The APPLY clause acts like a JOIN without the ON clause and comes in two flavors: CROSS and OUTER.

  • The OUTER APPLY clause returns all the rows on the left side (@t) whether they return any rows in the table-valued-function or not. The columns that the table-valued-function returns are null if no rows are returned.
  • The CROSS APPLY only returns rows from the left side (@t) if the table-valued-function returns rows.


This tip hopefully shows you the power of XML and the use of 'CROSS APPLY'. There are other options to split strings in a single query using recursive CTEs, but we will save that for another tip.
 
Next Steps

  • Now whenever splitting of string is required you can easily cast the string into XML, by replacing the delimiter with XML start and end tags and then use the method shown above to split the string.
  • Take some time to get familiar with the XML features in SQL Server to see if you can simplify your processing.
     
Readers Who Read This Tip Also Read
posted by LifeisSimple
2010. 11. 26. 22:40 Brain Trainning/DataBase

출처 : http://www.mssqltips.com/tip.asp?tip=1687

Installing SQL Server 2008 on a Windows Server 2008 Cluster Part 1

Written By: Edwin Sarmiento -- 2/13/2009 -- read/post comments -- print -- Bookmark and Share 

Rating:  Rate 

Problem
In a previous tip on SQL Server 2008 Installation Process, we have seen how different SQL Server 2008 installation is from its previous versions. Now, we have another challenge to face: installing SQL Server 2008 on a Windows Server 2008 Cluster. Windows Server 2008 has a lot of differences from its previous versions and one of them is the clustering feature. How do I go about building a clustered SQL Server 2008 running on Windows Server 2008?

Solution
There have been a lot of changes regarding clustering between Windows Server 2003 and Windows Server 2008. It took quite a lot of effort for us to build a cluster in Windows Server 2003 - from making sure that the server hardware for all nodes are cluster-compatible to creating resource groups. Microsoft has redefined clustering with Windows Server 2008, making it simpler and easier to implement. Now that both SQL Server 2008 and Windows Server 2008 are out in the market for quite some time, it would be a must to prepare ourselves to be able to setup and deploy a clustered environment running both. Installing SQL Server on a stand-alone server or member server in the domain is pretty straight-forward. Dealing with clustering is a totally different story. The goal of this series of tips is to be able to help DBAs who may be charged with installing SQL Server on a Windows Server 2008 cluster.

Prepare the cluster nodes

I will be working on a 2-node cluster throughout the series and you can extend it by adding nodes later on. You can do these steps on a physical hardware or a virtual environment. I opted to do this on a virtual environment running VMWare. To start with, download and install a copy of the evaluation version of Windows Server 2008 Enterprise Edition. This is pretty straight-forward and does not even require any product key or activation. Evaluation period runs for 60 days and can be extended up to 240 days so you have more than enough time to play around with it. Just make sure that you select at least the Enterprise Edition during the installation process and have at least 12GB of disk space for your local disks. This is to make sure you have enough space for both Windows Server 2008 and the binaries for SQL Server 2008. A key thing to note here is that you should already have a domain on which to join these servers and that both have at least 2 network cards - one for the public network and the other for the heartbeat. Although you can run a cluster with a single network card, it isn't recommend at all. I'll lay out the details of the network configuration as we go along. After the installation, my recommendation is to immediately install .NET Framework 3.5 with Service Pack 1 and Windows Installer 4.5 (the one for Windows Server 2008 x86 is named Windows6.0-KB942288-v2-x86.msu). These two are prerequisites for SQL Server 2008 and would speed up the installation process later on.

Carve out your shared disks

We had a lot of challenges in Windows Server 2003 when it comes to shared disks that we will use for our clusters. For one, the 2TB limit which has a lot to do with the master boot record (MBR) has been overcome by having the GUID Partition Table (GPT) support in Windows Server 2008. This allows you to have 16 Exabytes for a partition. Another has been the use of directly attached SCSI storage. This is no longer supported for Failover Clustering in Windows Server 2008. The only supported ones will be Serially Attached Storage (SAS), Fiber Channel and iSCSI. For this example, we will be using an iSCSI storage with the help of an iSCSI Software Initiator to connect to a software-based target. I am using StarWind's iSCSI SAN to emulate a disk image that my cluster will use as shared disks. In preparation for running SQL Server 2008 on this cluster, I recommend creating at least 4 disks - one for the quorum disk, one for MSDTC, one for the SQL Server system databases and one for the user databases. Your quorum and MSDTC disks can be as small as 1GB, although Microsoft TechNet specifies a 512MB minimum for the quorum disk. If you decide to use iSCSI as your shared storage in a production environment, a dedicated network should be used so as to isolate it from all other network traffic. This also means having a dedicated network card on your cluster nodes to access the iSCSI storage.

Present your shared disks to the cluster nodes

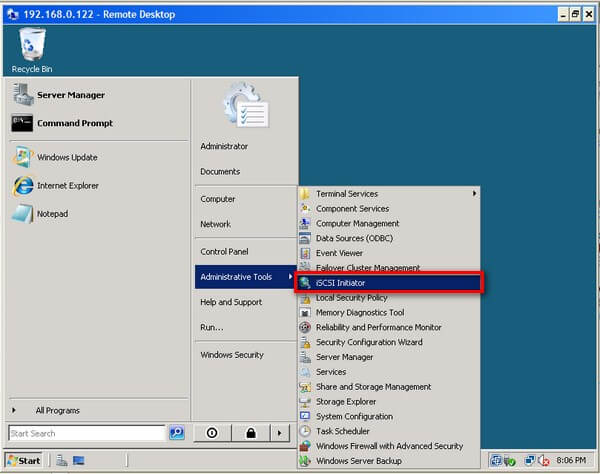
Windows Server 2008 comes with iSCSI Initiator software that enables connection of a Windows host to an external iSCSI storage array using network adapters. This differs from previous versions of Microsoft Windows where you need to download and install this software prior to connecting to an iSCSI storage. You can launch the tool from Administrative Tools and select iSCSI Initiator.

To connect to the iSCSI target:

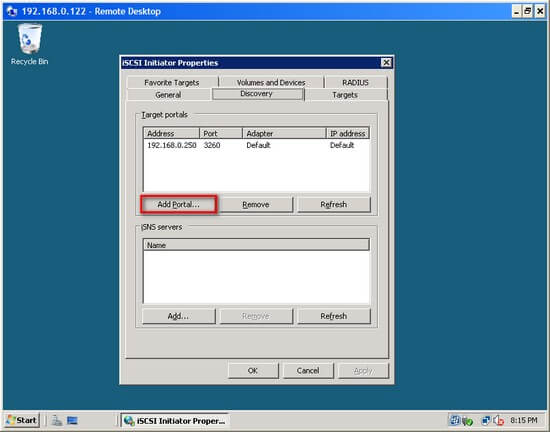
  1. In the iSCSI Initiator Properties page, click on the Discovery tab.

  2. Under the Target Portals section, click on the Add Portal button.
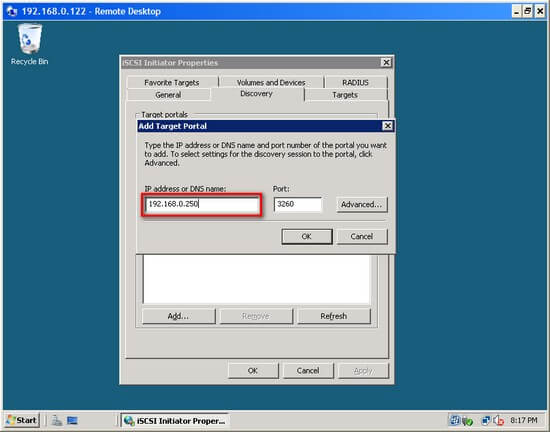
  3. In the Add Target Portal dialog, enter the DNS name or IP address of your iSCSI Target and click OK. If you are hosting the target on another Windows host as an image file, make sure that you have your Windows Firewall configured to enable inbound traffic to port 3260. Otherwise, this should be okay.


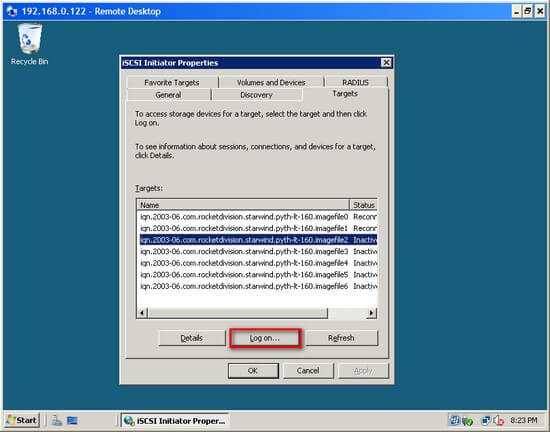
  4. Back in the iSCSI Initiator Properties page, click on the Targets tab. You should see a list of the iSCSI Targets that we have defined earlier


  5. Select one of the targets and click on the Log on button.
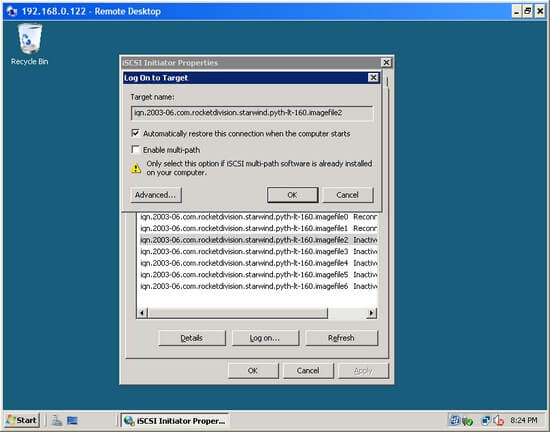
  6. In the Log On to Target dialog, select the Automatically restore this connection when the computer starts checkbox. Click OK.

  7. Once you are done, you should see the status of the target change to Connected. Repeat this process for all the target disks we initially created on both of the servers that will become nodes of your cluster.

Once the targets have been defined using the iSCSI Initiator tool, you can now bring the disks online, initialize them, and create new volumes using the Server Manager console. I won’t go into much detail on this process as it is similar to how we used to do it in Windows Server 2003, except for the new management console. After the disks have been initialized and volumes created, you can try logging in to the other server and verify that you can see the disks there as well. You can rescan the disks if they haven’t yet appeared.

Adding Windows Server 2008 Application Server Role

Since we will be installing SQL Server 2008 later on, we will have to add the Application Server role on both of the nodes. A server role is a program that allows Windows Server 2008 to perform a specific function for multiple clients within a network. To add the Application Server role,

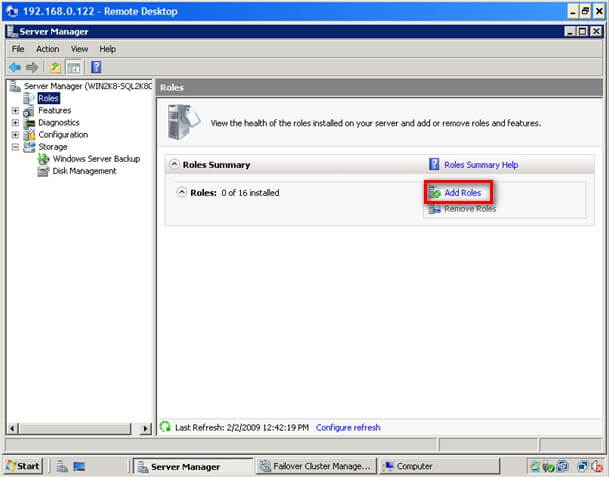
  1. Open the Server Manager console and select Roles.
  2. Click the Add Roles link.  This will run the Add Roles Wizard

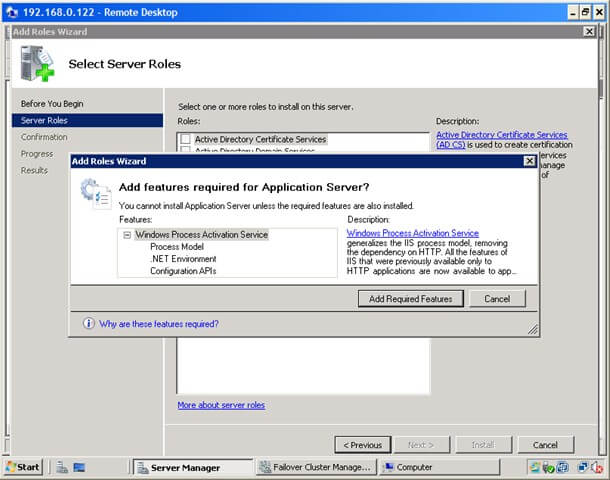
  3. In the Select Server Roles dialog box, select the Application Server checkbox. This will prompt you to add features required for Application Server role. Click Next.

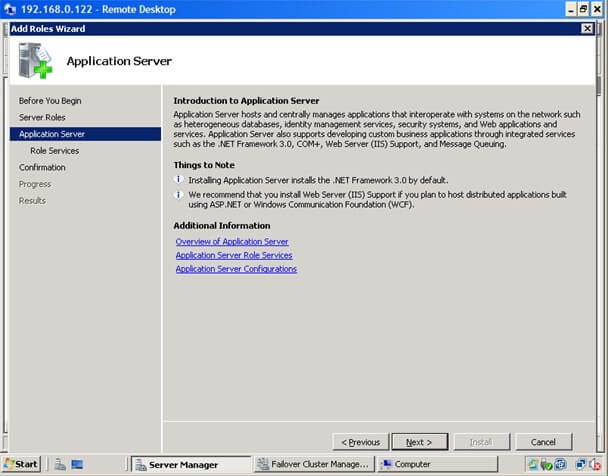
  4. In the Application Server dialog box, click Next.

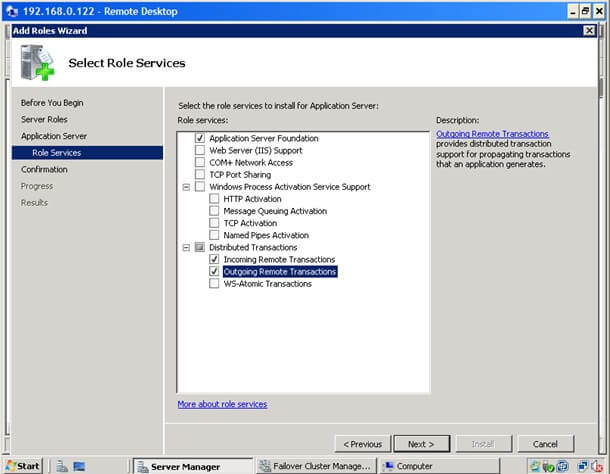
  5. In the Select Role Services dialog box, select Incoming Remote Transactions and Outgoing Remote Transactions checkboxes. These options will be used by MSDTC. Click Next

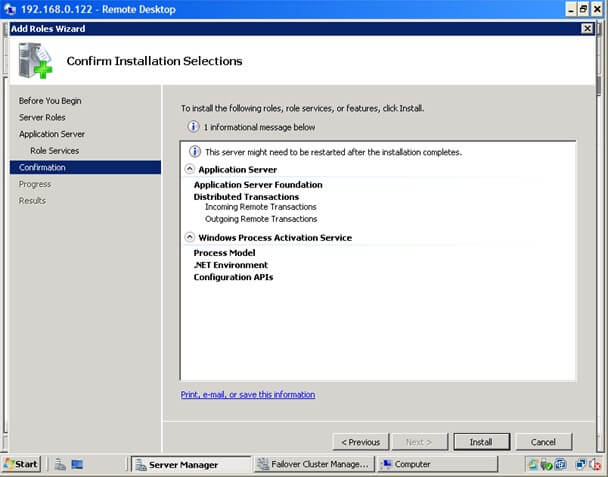
  6. In the Confirm Installation Selections dialog box, click Install. This will go thru the process of installing the Application Server role

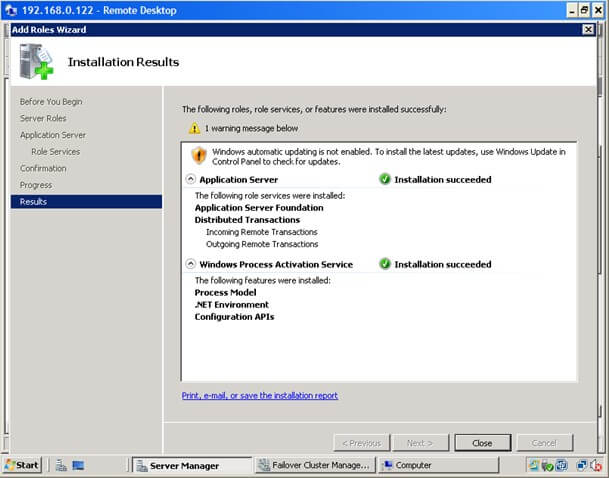
  7. In the Installation Results dialog box, click Close. This completes the installation of the Application Server role on the first node. You will have to repeat this process for the other server

We have now gone thru the process of creating the cluster at this point. In the next tip in this series, we will go thru the process of installing the Failover Cluster feature, validating the nodes that will become a part of the cluster and creating the cluster itself. And that is just on the Windows side. Once we manage to create a working Windows Server 2008 cluster, that's the only time we can proceed to install SQL Server 2008.

Next Steps

  • Download and install an Evaluation copy of Windows Server 2008 for this tip
  • Start working on building your test environment in preparation for building a SQL Server 2008 cluster on Windows Server 2008
  • Read Part2, Part3 and Part4 

Readers Who Read This Tip Also Read

posted by LifeisSimple
2010. 11. 22. 22:30 Brain Trainning/DataBase

declare @jobName nvarchar(255)


declare curJobs cursor fast_forward for

                  select name from dbo.sysjobs where owner_sid = suser_sid('old_account', 0) order by name


open curJobs


fetch next from curJobs

                  into @jobName


while @@FETCH_STATUS = 0

begin

                  EXEC msdb.dbo.sp_update_job @job_name=@jobName, @owner_login_name='new_account'


                  fetch next from curJobs

                                   into @jobName  

end


close curJobs

deallocate curJobs


posted by LifeisSimple
2010. 11. 16. 12:26 Brain Trainning/DataBase

SQL Server 2005 DBCC Command Quick Reference

By Jon Reade, 2004/12/16

Total article views: 31742 | Views in the last 30 days: 226

SQL Server 2005 DBCC Command Quick Reference

New, undocumented and retired DBCC Commands in SQL Server 2005

Seven new DBCC commands have been introduced by Microsoft's SQL Server development team.
Unfortunately little or no documentation is available on the new commands listed below, though some of them may be documented in the RTM release.
Those that are listed as being documented do not require a trace flag to be set before using them.
However, to use the undocumented commands, you will need to turn on trace flag 2588.
This has changed since SQL Server 7.0/2000, where the trace flag was 2520.

Please note that the following is a result of investigations with the beta 2 release of SQL Server 2005, the final RTM release may differ slightly.

As always, never use an undocumented DBCC command on a production server unless advised by Microsoft, and never use a documented one unless you understand how it may affect the performance of your server.

DBCC commands new to SQL Server 2005

Documented new commands

    freesessioncache () -- no parameters
    requeststats ({clear} | {setfastdecayrate, rate} | {setslowdecayrate, rate})

Undocumented new commands

    mapallocunit (I8AllocUnitId | {I4part, I2part})
    metadata ({'print' [, printopt = {0 |1}] | 'drop' | 'clone' [, '' | ....]}, {'object' [, 'type',...}, {Id | Name}, [{Ownerid | Ownername}], [{Dbid | Dbname}]])
    optimizer_whatif property, value
    persiststackhash (hashfile, BUFLATCH_TIMEOUT | ATTENTION | OUTOFLOCKS | LATCH_ATTN | OUTOFLOG | OUTOFMEM | SOS [, SKIPLAST | INCLUDELAST])
    semetadata (object id | name, index id | name [, partition id])

DBCC commands altered since SQL Server 2000

The following is presented as a list of pairs of commands. The first command is the old syntax, as used in SQL Server 2000. The second of each pair is the altered syntax new to SQL Server 2005. In most cases the commands have been extended to take advantage of passing an object ID instead of a name, but if your scripts use any of these commands, it's probably worth checking them out before you migrate to SS2K5.

2000 : checkalloc [('database_name'[, NOINDEX | REPAIR])] [WITH NO_INFOMSGS[, ALL_ERRORMSGS][, ESTIMATEONLY]]
2005 : checkalloc [('dbname'|dbid[, NOINDEX | REPAIR])] [WITH NO_INFOMSGS[,ALL_ERRORMSGS][, ESTIMATEONLY]]
Changes : SQL Server 2005 now accepts the dbid as well as the dbname

2000 : checkdb [('database_name'[, NOINDEX | REPAIR])] [WITH NO_INFOMSGS[, ALL_ERRORMSGS][, PHYSICAL_ONLY][, ESTIMATEONLY][, TABLOCK]
2005 : checkdb [('dbname | dbid'[, NOINDEX | REPAIR])] [WITH NO_INFOMSGS[,ALL_ERRORMSGS][, PHYSICAL_ONLY][, ESTIMATEONLY][, TABLOCK]]
Changes : SQL Server 2005 now accepts the dbid as well as the dbname

2000 : checkident ('table_name'[, { NORESEED | {RESEED [, new_reseed_value] } } ] )
2005 : checkident ('table_name'[, { NORESEED | {RESEED [, new_reseed_value] } } ] )
Changes :
Although the syntax is identical for SQL Server 2000 and 2005, there is a subtle change in the behaviour of this command.
In SQL Server 7.0 and 2000, running checkident would cause the identity column to be re-seeded, even if the table was empty.
In SQL Server 2005, if the table is empty when dbcc checkident is run, the reseed value will be ignored.

2000 : dbrepair ('dbname', DROPDB [, NOINIT])
2005 : dbrepair ('dbname', markdirty | {dropdevice, int} | {repairindex, int, int})
Changes : dropdevice syntax changed ; markdirty and repairindex options added
NB : It seems odd that this command has been extended with this release, as in the SQL Server 2005 setup help file, setupsql9.chm, it states that DROP DATABASE should be used instead of this command. It was included in SQL Server 2000 for backward compatibility only.

2000 : indexdefrag ({dbid | dbname | 0}, {tableid | tablename}, {indid | indname})
2005 : indexdefrag ({dbname | dbid | 0}, {tableid | tablename} [, {indid | indname} [, partition_number]])
Changes : An extra optional parameter has been added, partition_number

2000 : inputbuffer (spid)
2005 : inputbuffer (spid, [batchid])
Changes : An extra optional parameter has been added, batch_id

2000 : outputbuffer (spid)
2005 : outputbuffer (spid, [batchid])
Changes : An extra optional parameter has been added, batch_id

2000 : proccache
2005 : proccache ([compplan_ticks_threshold])
Changes : An optional parameter has been added, compplan_ticks_threshold

2000 : sqlperf (LOGSPACE)({IOSTATS | LRUSTATS | NETSTATS | RASTATS [, CLEAR]} | {THREADS} | {LOGSPACE})
2005 : sqlperf (LOGSPACE | IOSTATS | NETSTATS | RASTATS [, CLEAR]} | [THREADS] )
Changes : As for 2000, but LRUSTATS has been removed as an option.
NB : Microsoft only document the LOGSPACE parameter of this command - use any others at your own discretion.

2000 : updateusage ({'database_name'| 0} [, 'table_name' [, index_id]]) [WITH [NO_INFOMSGS] [,] COUNT_ROWS]
2005 : updateusage ({'dbname' | dbid | 0} [, {'table_name' | table_id} [,{index_id | 'index_name'}]]) [WITH [NO_INFOMSGS] [,] COUNT_ROWS]
Changes : Can now specify db_id, table_id, or the index name as parameters, instead of just the db/table/index name.

Also note that there is a problem with the output generated by the dbcc showcontig command under certain conditions in the beta version of SQL Server 2005, where more than one block of information per index is generated for tables that contain text columns.

DBCC commands retired since SQL Server 2000

Many of us have used them at one time or another and a few might even depend upon them. However, we can't say we have not been warned, and Microsoft have finally retired a whole raft of dbcc commands in SQL Server 2005.
Most of these were not particularly useful, but thoughtfully retained right up to SQL Server 2000 for backward compatibility with SQL Server 6.5 and earlier scripts.
The following dbcc commands are now dead and buried from SQL Server 2005 onwards:

adduserobject (name)
balancefactor (variance_percent)
bufcount [(number_of_buffers)]
cacheprofile [( {actionid} [, bucketid])
checkdbts (dbid, newTimestamp)]
des [( {'dbname' | dbid} [, {'objname' | objid} ])]
dropuserobject ('object_name')
getvalue (name)
iotrace ( { 'dbname' | dbid | 0 | -1 }, { fileid | 0 }, bufsize, [ { numIOs | -1 } [, { timeout (sec) | -1 } [, printopt={ 0 | 1 }]]] )
lockobjectschema ('object_name')
matview ({'PERSIST' | 'ENDPERSIST' | 'FREE' | 'USE' | 'ENDUSE'})
memospy
memusage ([IDS | NAMES], [Number of rows to output])
monitorevents ('sink' [, 'filter-expression'])
newalloc (previously retired, use of checkalloc recommended instead)
perflog
pglinkage (dbid, startfile, startpg, number, printopt={0|1|2}, targetfile, targetpg, order={1|0})
procbuf [({'dbname' | dbid}[, {'objname' | objid}[, nbufs[, printopt = { 0 | 1 } ]]] )]
rebuild_log (dbname [, filename])
row_lock (dbid, tableid, set) - Not Needed
shrinkdb (previously retired, use of shrinkdatabase recommended instead)
tab ( dbid, objid )
tape_control {'query' | 'release'}[,('\\.\tape')]
textall [({'database_name'|database_id}[, 'FULL' | FAST] )]
textalloc ({'table_name'|table_id}[, 'FULL' | FAST])
upgradedb (db)
usagegovernor (command, value)
wakeup (spid)

DBCC commands included in SQL Server 2005, which will be retired at a later date

dbreindex
This will be replaced with the REBUILD option of the ALTER INDEX statement.

indexdefrag
This will be replaced with the REORGANIZE option of the ALTER INDEX statement.

showcontig
This command will be replace by the system function fn_indexinfo

Complete list of documented SQL Server 2005 DBCC commands

checkalloc [('dbname'|dbid[, NOINDEX | REPAIR])] [WITH NO_INFOMSGS[, ALL_ERRORMSGS][, ESTIMATEONLY]]
checkcatalog [('dbname'|dbid)] [WITH NO_INFOMSGS]
checkconstraints [( 'tab_name' | tab_id | 'constraint_name' | constraint_id )] [WITH ALL_CONSTRAINTS | ALL_ERRORMSGS]
checkdb [('dbname | dbid'[, NOINDEX | REPAIR])] [WITH NO_INFOMSGS[, ALL_ERRORMSGS][, PHYSICAL_ONLY][, ESTIMATEONLY][, TABLOCK]]
checkfilegroup [( [ {'filegroup_name' | filegroup_id} ] [, NOINDEX] )] [WITH NO_INFOMSGS[, ALL_ERRORMSGS][, PHYSICAL_ONLY][, ESTIMATEONLY][, TABLOCK]]
checkident ('table_name'[, { NORESEED | {RESEED [, new_reseed_value] } } ] )
checktable ('table_name'[, {NOINDEX | index_id | REPAIR}]) [WITH NO_INFOMSGS[, ALL_ERRORMSGS][, PHYSICAL_ONLY][, ESTIMATEONLY][, TABLOCK]]
cleantable ('dbname'|dbid, 'table_name'|table_id [, batch_size])
concurrencyviolation (reset | display | startlog | stoplog)
dbreindex ('table_name' [, index_name [, fillfactor]]) [WITH NO_INFOMSGS]
dbrepair ('dbname', markdirty | {dropdevice, int} | {repairindex, int, int})
dropcleanbuffers
free dll_name (FREE) e.g. DBCC xp_sample (FREE)
freeproccache
freesessioncache
help ('dbcc_command' | '?')
indexdefrag ({dbname | dbid | 0}, {tableid | tablename} [, {indid | indname} [, partition_number]])
inputbuffer (spid, [batchid])
opentran [({'dbname'| dbid})] [WITH TABLERESULTS[,NO_INFOMSGS]]
outputbuffer (spid, [batchid])
perfmon
pintable (database_id, table_id)
proccache ([compplan_ticks_threshold])
requeststats ({clear} | {setfastdecayrate, rate} | {setslowdecayrate, rate})
show_statistics ('table_name'[, 'target_name'])
showcontig ([table_id | table_name [, index_id | index_name]] [WITH FAST, ALL_INDEXES, TABLERESULTS [,ALL_LEVELS]])
shrinkdatabase ({'dbname'|dbid}, [freespace_percentage [, {NOTRUNCATE | TRUNCATEONLY}]])
shrinkfile ({fileid | 'filename'} {[, EMPTYFILE] | [[, compress_size] [, {NOTRUNCATE | TRUNCATEONLY}]]})
sqlperf (LOGSPACE)
traceoff [( tracenum [, tracenum ... ] )]
traceon [( tracenum [, tracenum ... ] )]
tracestatus (trace# [, ...trace#])
unpintable (dbid, table_id)
updateusage ({'dbname' | dbid | 0} [, {'table_name' | table_id} [, {index_id | 'index_name'}]]) [WITH [NO_INFOMSGS] [,] COUNT_ROWS]
useroptions

Complete list of undocumented SQL Server 2005 DBCC commands

activecursors [(spid)]
addextendedproc (function_name, dll_name)
addinstance (objectname, instancename)
auditevent (eventclass, eventsubclass, success, loginname, rolename, dbusername, loginid, objname, servername, providername)
autopilot (typeid [, dbid [, {maxQueryCost | tabid [, indid [, pages [, flag [, rowcounts]]]]} ]])
buffer ( {'dbname' | dbid} [, objid [, number [, printopt={0|1|2} ][, dirty | io | kept | rlock | ioerr | hashed ]]])
bytes ( startaddress, length )
cacheprofile ( actionid [, bucketid])
cachestats
callfulltext - system sp use only
checkprimaryfile ( {'FileName'} [, opt={0|1|2|3} ])
clearspacecaches ('dbname'|dbid, 'table_name'|table_id, 'index_name'|index_id [, partition_number])
collectstats (on | off)
cursorstats ([spid [,'clear']])
dbrecover (dbname [, IgnoreErrors])
dbreindexall (dbname|dbid[, type_bitmap])
debugbreak
deleteinstance (objectname, instancename)
detachdb ( 'dbname' [, fKeep_Fulltext_Index_File (0 | 1)] )
dropextendedproc (function_name)
config
dbinfo [('dbname')]
dbtable [({'dbname' | dbid})]
lock ([{'DUMPTABLE' | 'DUMPSTATS' | 'RESETSTATS' | 'HASH'}]|[{'STALLREPORTTHESHOLD', stallthreshold}])
log (dbname | dbid [,{0|1|2|3|4}[,['lsn','[0x]x:y:z']|['numrecs',num]|['xdesid','x:y']|['extent','x:y']|['pageid','x:y']|['objid',{x,'y'}]|['logrecs',{'lop'|op}...]|['output',x,['filename','x']]...]]])
page ( {'dbname' | dbid}, filenum, pagenum [, printopt={0|1|2|3} ])
pss [(uid[, spid[, printopt = { 1 | 0 }]] )]
resource
dumptrigger ({'BREAK', {0 | 1}} | 'DISPLAY' | {'SET', exception_number} | {'CLEAR', exception_number})
errorlog
extentinfo [({'dbname'| dbid | 0} [, {'tablename' | tableid} [, {'indexname' | indexid | -1} [, partition_number]]])]
fileheader [( {'dbname' | dbid} [, fileid])
fixallocation [({'ADD' | 'REMOVE'}, {'PAGE' | 'SINGLEPAGE' | 'EXTENT' | 'MIXEDEXTENT'}, filenum, pagenum [, objectid, indexid, partitionid, allocUnitId])
flush ('data' | 'log', dbname | dbid)
flushprocindb (dbid)
freeze_io (dbname | dbid)
icecapquery ('dbname' [, stored_proc_name [, #_times_to_icecap (-1 infinite, 0 turns off)]])
Use 'dbcc icecapquery (printlist)' to see list of SP's to profile.
Use 'dbcc icecapquery (icecapall)' to profile all SP's.
incrementinstance (objectname, countername, instancename, value)
ind ( { 'dbname' | dbid }, { 'objname' | objid }, { indid | 0 | -1 | -2 } [, partition_number] )
invalidate_textptr (textptr)
invalidate_textptr_objid (objid)
latch ( address [, 'owners'] [, 'stackdumps'])
loginfo [({'dbname' | dbid})]
mapallocunit (I8AllocUnitId | {I4part, I2part})
memobjlist [(memory object)]
memorymap
memorystatus
metadata ({'print' [, printopt = {0 |1}] | 'drop' | 'clone' [, '' | ....]}, {'object' [, 'type',...}, {Id | Name}, [{Ownerid | Ownername}], [{Dbid | Dbname}]])
no_textptr (table_id , max_inline)
optimizer_whatif property, value
persiststackhash (hashfile, BUFLATCH_TIMEOUT | ATTENTION | OUTOFLOCKS | LATCH_ATTN | OUTOFLOG | OUTOFMEM | SOS [, SKIPLAST | INCLUDELAST])
prtipage (dbname | dbid, objid | objname, indexid | indexname [, partition_number [, level]]). No partition specified uses the first partition. No level specified prints root page.
readpage ({'dbname'|dbid}, fileid, pageid, formatstr [, printopt = { 0 | 1} ])
renamecolumn (object_name, old_name, new_name)
ruleoff ({ rulenum | rulestring } [, { rulenum | rulestring } ]+)
ruleon ( rulenum | rulestring } [, { rulenum | rulestring } ]+)
semetadata (object id | name, index id | name [, partition id])
setcpuweight (weight)
setinstance (objectname, countername, instancename, value)
setioweight (weight)
showdbaffinity
showfilestats [(file_num)]
showoffrules
showonrules
showtableaffinity (table_id | table_name [, partition_number])
showtext ('dbname' | dbid, {textpointer | {fileid, pageid, slotid [,option]}})
showweights
sqlmgrstats
stackdump [( {uid[, spid [, batchid [, ecid]]} | {threadId, 'THREADID'}] )]
tec [( uid[, spid[, batchid[, ecid]] )]
thaw_io (dbname | dbid)
useplan [(number_of_plan)]
writepage ({'dbname' | dbid}, fileid, pageid, offset, length, data)

Acknowledgements and references:

SQL Server 2005 Express Edition
Except where noted below, the above investigation was carried out on the Beta 2 release of SQL Server 2005 Express Edition.
At the time of writing (November 2004) this product was available as a free download at http://www.microsoft.com/sql/

SQL Server 2005 Setup Help (c) Microsoft Corporation 2004.
The information about future discontinued DBCC commands was sourced from Microsoft's SQL Server 2005 setup help file.
It is recommended reading for anyone who writes commercial database software that depends upon the lower-level functionality provided by SQL Server, as it includes details of discontinued commands and configuration options.
This document can be found at C:\Program Files\Microsoft SQL Server\90\Setup Bootstrap\Help\1033\setupsql9.chm, after installing SQL Server 2005 Express Edition to the default installation directory.
Search on "dbcc" to find this information.

Jon Reade November 2004

By Jon Reade, 2004/12/16

Total article views: 31742 | Views in the last 30 days: 226

posted by LifeisSimple
2010. 11. 16. 11:59 Brain Trainning/DataBase

CLR Stored Procedure Calling External Web Service - SQL Server 2005 Tutorials

by David Hayden ( SQL Server Developer )


SQL Server 2005 has a number of cool new developer features, such as Http EndpointXML DataType, etc. The CLR ( Common Language Runtime ) is also hosted inside of SQL Server 2005, allowing one to leverage the power of the .NET Framework and T-SQL in a power combination, exploiting each to do what it does best. A good example I previously wrote was to leverage regular expressions ( RegEx ) in .NET and CLR User Defined Functions ( UDF 's ) to put a check constraint on a table that verifies an email address is indeed an email address when entered into a table:

In this example, I am exploring the ability to write a CLR stored procedure that calls an external web service from within the stored procedure before inserting a record in a table. The developer in me says that this is not something I would do in a production environment, but the hobbyist in me wanted to test this functionality just to see how it could be done.

The inspiration for this example came from another article, called Consuming a Web Service from a SQL Server 2005 CLR Assembly, in Simple Talk doing essentially the same thing. I ran across some problems while working through the tutorial which I thought I would highlight here as well as changed the scenario so it was easier to understand, more thorough in many cases, and showed off a few other things. However, the inspiring tutorial is very enightening, so I recommend reading it here.


CLR Stored Procedure Application Architecture

The architecture for this CLR stored procedure is fairly straight forward. The client of this application calls a CLR stored procedure, called InsertLocation, which accepts 3 input parameters: City, State, and Country.

InsertLocation calls the publicly available external web service, called Terraserver-USA web service, to get an aerial view map of the city as stored in its database of aerial images provided by the US Geological Survey (USGS).

The City, State, Country, and AerialMap is then stored in a table, called Locations.

The architecture can be briefly shown as follows:


Enabling CLR in SQL Server 2005

First things first, one needs to enable CLR in SQL Server 2005 by doing the following:


sp_configure 'clr enabled', 1
GO
RECONFIGURE
GO


Create ClrWebServices Database and Make Database Trustworthy

Create the ClrWebServices Database. Since our database will be accessing external resources, you will need to make it trustworthy:


alter database ClrWebServices set trustworthy on


Create Locations Table

Create the Locations Table in the ClrWebServices Database:


USE [ClrWebServices]
GO

SET ANSI_NULLS ON
GO
SET QUOTED_IDENTIFIER ON
GO
CREATE TABLE [dbo].[Locations](
    [ID] [int] IDENTITY(1,1) NOT NULL,
    [City] [nvarchar](200) COLLATE
SQL_Latin1_General_CP1_CI_AS NOT NULL, [State] [nvarchar](
200) COLLATE
SQL_Latin1_General_CP1_CI_AS NOT NULL, [Country] [nvarchar](
200) COLLATE
SQL_Latin1_General_CP1_CI_AS NOT NULL, [AerialMap] [image] NOT NULL, CONSTRAINT [PK_Locations] PRIMARY KEY CLUSTERED ( [ID] ASC )WITH (IGNORE_DUP_KEY
= OFF) ON [PRIMARY] ) ON [PRIMARY] TEXTIMAGE_ON [PRIMARY]


WSDL - Run WSDL.exe Utility to Generate Web Service Proxy

We need a c# proxy class that will be used to access the Terraserver-USA web service.  The WSDL.exe application located in the Visual Studio SDK/Bin directly will do this for us:


wsdl /o:TerraService.cs /n:ClrWebServices.Text
         http://www.terraserver-usa.com/TerraService2.asmx


This generates a file, called TerraService.cs, that has a public c# class within it, called TerraService, within the namespace ClrWebServices.Test.


Create CLR Stored Procedure

Create the CLR Stored Procedure that uses TerraService to obtain a aerial view map of the city and then store the city, state, country, and map in the Locations Table:


using System;
using System.Data;
using System.Data.SqlClient;
using System.Data.SqlTypes;
using Microsoft.SqlServer.Server;
using ClrWebServices.Test;


public partial class StoredProcedures
{
    [Microsoft.SqlServer.Server.SqlProcedure]
    public static void InsertLocation(SqlString city,
                SqlString state, SqlString country)
    {
         using (SqlConnection cn =
           new SqlConnection("context connection=true"))
         {
            string query = "INSERT INTO dbo.Locations
                    (City,State,Country,AerialMap) VALUES
                    (@City, @State, @Country, @Image)";
            
            using (SqlCommand insertCommand =
                                new SqlCommand(query,cn))
            {
                SqlParameter[] sqlParams =
                    new SqlParameter[4];
                sqlParams[0] =
                    new SqlParameter("@City", city);
                sqlParams[1] =
                    new SqlParameter("@State", state);
                sqlParams[2] =
                    new SqlParameter("@Country", country);
                sqlParams[3] =
                    new SqlParameter("@Image",
                    GetLocationImage(city,state,country));
            
                insertCommand.Parameters.AddRange(sqlParams);
            
                cn.Open();
                insertCommand.ExecuteNonQuery();
                cn.Close();
            }
         }
    }

    public static byte[] GetLocationImage(SqlString city,
                    SqlString state, SqlString country)
    {
        TerraService service = new TerraService();

        Place place = new Place();
        place.City = city.ToString();
        place.State = state.ToString();
        place.Country = country.ToString();

        PlaceFacts facts = service.GetPlaceFacts(place);

        TileMeta meta = service.GetTileMetaFromLonLatPt
            (facts.Center, 1,
            ClrWebServices.Test.Scale.Scale16m);
        return service.GetTile(meta.Id);
    }
};


This file is saved as InsertLocation.cs.


Compile CLR Stored Procedure with Web Services Proxy

Now one needs to compile the CLR Stored Procedure and Web Services Proxy into a single DLL as well as create XML Serialization Code, because dynamic XML Serialization is not allowed in SQL Server.


// Creates InsertLocation.dll
csc /t:library InsertLocation.cs TerraService.cs

// Generate XML Serialization Code
// Creates InsertLocation.XmlSerializers.dll
sgen /a:InsertLocation.dll


Create Assemblies and Stored Procedure

The very last piece is to create the assemblies and stored procedures in SQL Server 2005.


CREATE ASSEMBLY ClrWebServices
FROM 'C:\ClrWebServices\InsertLocation.dll'
WITH PERMISSION_SET = UNSAFE;
GO


CREATE ASSEMBLY [ClrWebServices.XmlSerializers]
FROM 'C:\ClrWebServices\InsertLocation.
XmlSerializers.dll
' WITH PERMISSION_SET = SAFE; GO CREATE PROCEDURE InsertLocation(@city nvarchar(200), @state nvarchar(200), @country nvarchar(200)) AS EXTERNAL NAME ClrWebServices.StoredProcedures
.InsertLocation GO


Here you can see all the major players in out CLR stored procedure example:


Test CLR Stored Procedure

Now one can go ahead and execute the stored procedure, InsertLocation, from withing SQL Server Management Studio. While executing the CLR stored procedure will execute a couple of web services calls to Terraserver to get the proper aerial view map. Don't expect it to be fast :)  Check the Locations Table to verify the image has been properly stored in the AerialMap column.


Conclusion

CLR Stored Procedures can consume XML web services inside them. Although it is technically possible, this may not be the best architectural approach in your .NET applications. Proceed with caution, but have fun.


Source: David Hayden ( SQL Server Developer )


출처 : http://davidhayden.com/blog/dave/archive/2006/04/25/2924.aspx

posted by LifeisSimple
2010. 10. 4. 00:00 Brain Trainning/DataBase
SQL Server 2008 SP2가 나왔습니다. 

지금 적용을 하면 마루타가 될까요? ㅎㅎㅎ

적용 방법은 요렇게...  (2005 와 2008은 패치 방법이 다릅니다.)

Apply a service pack or patch SQL Server 2008 in a clustered environment 
    Step 1 : Validation wizard 
    Step 2 : Pre-check
    Step 3 : Installation of the first node
    Step 4 : Add a new node 
    Step 5: Apply a service pack or hotfix on a SQL cluster 

Installing Service Pack SQL Server 2008 in failover cluster is very different than the SQL Server 2005 cluster failover.

With SQL Server 2005, when you start installing cluster service pack (or hotfix), it must be launched on the active node (node that hosts the instance). When installing the Setup will launch simultaneously  "remote silence" on all passive nodes. All nodes in the cluster containing the SQL Server instance are updated in the same time.

With SQL Server 2008, to reduce the downtime, we have revised the method of deployment. Now if you want to apply a service pack (or hotfix), you must install in first on the passive nodes. The passive nodes are updated before the active node.

Therefore, for your instance SQL Server 2008  in failover cluster, you must follow the scenario below for the application of Service Pack, Cumulative Update or Hotfix :

1.  Apply the hotfix on pasive node N2
2.  Reboot the passive node N2
3.  Failover on SQL resource : the passive node become the active node
4.  Apply the hotfix on the passive node N1
5.  Reboot the passive node N1

You can check the version of SQL server with the following query:

SELECT   

      SERVERPROPERTY('IsClustered') as _1_Means_Clustered ,   
      
SERVERPROPERTY('Edition') as Edition ,   
      
SERVERPROPERTY('ProductVersion') as Version  , 
      
      
SERVERPROPERTY('ComputerNamePhysicalNetBIOS') as ActiveNode


한글 링크는 아래에 


영문버전 링크

Files in this Download


The links in this section correspond to separate files available in this download. Download the files most appropriate for you.

File Name:
Size:
Download files below
Microsoft SQL Server 2008 SP2 Readme.htm
16KB
SQLServer2008SP2-KB2285068-IA64-ENU.exe
343.4MB
SQLServer2008SP2-KB2285068-x64-ENU.exe
349.8MB
SQLServer2008SP2-KB2285068-x86-ENU.exe
284.8MB

Quick Details


Version:
10.00.4000.00
Date Published:
9/29/2010
Change Language:
Knowledge Base (KB) Articles:

'Brain Trainning > DataBase' 카테고리의 다른 글

MNG : Backup 유지관리계획  (0) 2010.10.17
SQL Diag 이렇게 이용  (0) 2010.10.16
MySQL Clustering Config  (0) 2010.09.29
MySQL Clustering on Ubuntu  (0) 2010.09.29
MySQL Cluster 구성  (0) 2010.09.20
posted by LifeisSimple
2010. 9. 8. 11:44 Brain Trainning/DataBase
퍼나름... http://www.bradmcgehee.com/presentations/

맨땅에 해딩하면서 득도한 분의 블로그를 그대로 떳습니다. 좋은 자료가 많은 듯 합니다.

Brad M. McGehee


Presentations

Below are SQL Server presentations I have made at various user group meetings and conferences. Feel free to download for personal use.

Baton Rouge SQL Saturday

Baton Rouge, LA (August 14, 2010)

Database Maintenance Essentials (PDF, 1.4MB)
Essential DBA Skills: Best Practices Every SQL Server DBA Must Know (PDF, 1MB)

www.sqlsaturday.com

St. Louis SQL Server Users Group

St. Louis, MO (August 11, 2010)

Identifying SQL Server Performance Problems Using SQL Trace (ZIP, 800KB)
Essential DBA Skills: Introduction to Graphical Execution Plans (ZIP, 700KB)

www.stlssug.org

devLINK Technical Conference

Nashville, TN (August 5-7, 2010)

Identifying SQL Server Performance Problems Using SQL Trace (ZIP, 600KB)
How and When to ImplementIndexed Views (ZIP, 800KB)
Essential DBA Skills:Introduction to Graphical Execution Plans (ZIP, 700KB)

www.devlink.net

Hawaii .NET Users Group

Honolulu, HI (July 21, 2010)

Essential DBA Skills: Best Practices Every SQL Server Developer Should Know to Administer Their SQL Servers (PDF, 700KB)

www.hawaiidotnet.org

Pensacola SQL Saturday

Pensacola, FL (June 5, 2010)

Best Practices Every SQL Server DBA Should Know (PDF, 700KB)

www.SQLSaturday.com

IndyTechFest

Indianopolis, IN (May 22, 2010)

Database Maintenance Essentials (PDF, 500KB)

www.IndyTechFest.com

North Texas SQL Server Users Group

Dallas, TX (May 20, 2010)

How to Analyze Performance Monitor Data Using PAL (PDF, 500KB)

northtexas.sqlpass.org

24 Hours of PASS

Online Presentation (May 19, 2010)

Manage Your DBA Career: Don’t Let It Manage You (PDF, 400KB)

www.sqlpass.org

Chicago SQLSaturday

Chicago, IL (April 17, 2010)

Introduction to Graphical Execution Plans in SQL Server 2005/2008 (PDF, 1MB)
How and When to Implement Indexed Views (PDF, 900KB)

www.sqlsaturday.com

Chicago SQL Server Users Group

Chicago, IL (April 15, 2010)

How to Optimize tempdb Performance (PDF, 1MB)

chicago.sqlpass.org

Atlanta Microsoft Database Forum

Atlanta, GA (April 12, 2010)

How to Become an Exceptional DBA (PDF, 800KB)

www.atlantamdf.com

Baltimore SQL Server Users Group

Baltimore, MD (April 5, 2010)

How to Use the SQL Server 2008 Performance Data Collector to Analyze Query Performance (PDF, 600KB)

www.bssug.org

SQL Server Social Group

Cambridge, England (March 24, 2010)

How to Use the SQL Server 2008 Performance Data Collector to Analyze Query Performance (PDF, 600KB)

www.sqlsocial.com

SQL Lunch

Online Webinar (February 25, 2010)

Introduction to SQL Server Graphical Execution Plans (PDF, 1MB)

www.sqllunch.com

Pragmatic Works February SQL Server 101 Series

Online Webinar (February 23, 2010)

How to be an Exceptional DBA (PDF, 800KB)

PragmaticWorks.com

Olympia Area SQL Server Users Group

Tumwater, WA (February 11, 2010)

How and When to Use Indexed Views (PDF, 1.6MB)

olympia.sqlpass.org

Oregan SQL Develpers User Group

Portland, OR (February 10, 2010)

Introduction to Graphical Execution Plans (PDF, 1.4MB)

osql-d.sqlpass.org

Fall 2009 SQL Server Connections

Las Vegas, NV (November 12, 2009)

Free Software for SQL Server DBAs (PDF, 700KB)

www.devconnections.com

Fall 2009 SQL Server Connections

Las Vegas, NV (November 11, 2009)

Optimizing tempdb Performance (PDF, 1MB)
Introducing the SQL Server 2008 Data Collector (PDF, 800KB)

www.devconnections.com

2009 PASS Community Summit

Seattle, WA (November 4, 2009)

Identifying Performance Problems With SQL Trace (PDF, 300KB)
Demo T-SQL Files (ZIP, 5K)

www.sqlpass.org

2009 PASS Community Summit

Seattle, WA (November 3, 2009)

Mange Your DBA Career, Don’t Let it Manage You (PDF, 400K)

www.sqlpass.org

Dunedin .NET Users Group

Dunedin, New Zealand (October 22, 2009)

DBA 101: Best Practices All DBAs Should Know (PDF, 800K)

www.dot.net.nz/UserGroupPages/DunedinNET.aspx

Christchurch .NET Users Group

Christchurch, New Zealand (October 21, 2009)

How to Become an Exceptional DBA (PDF, 700K)

www.dot.net.nz/UserGroupPages/ChristchurchNET.aspx

Wellington SQL Server Users Group

Wellington, New Zealand (October 20, 2009)

Optimizing tempd Performance (PDF, 1MB)

wellington.sqlpass.org

Auckland SQL Server Users Group

Auckland, New Zealand (October 19, 2009)

DBA 101: Best Practices All DBAs Should Know (PDF, 800K)

www.aucklandsql.com

Sydney SQL Server Users Group

Sydney, Australia (October 13, 2009)

Getting the Most Out of the SQL Server 2005/2008 Profiler (PDF, 2MB)

www.sqlserver.org.au

Melbourne CBD SQL PASS Chapter

Melbourne, Australia (October 12, 2009)

Getting the Most Out of the SQL Server 2005/2008 Profiler (PDF, 2MB)

melbourne.sqlpass.org

SQL Down Under Code Camp

Wagga Wagga, Australia (October 10-11, 2009)

DBA 101: Best Practices All DBAs Should Know (PDF, 800K)
Introducing the SQL Server 2008 Data Collector (PDF, 800K)

www.sqldownunder.com/SDUCodeCamp/tabid/100/Default.aspx

Newcastle Coders Group

Newcastle, Australia (October 7, 2009)

Getting the Most Out of the SQL Server 2005/2008 Profiler (PDF, 2MB)

www.ncg.asn.au

Perth SQL Server Users Group

Perth, Australia (October 2, 2009)

Introducing the SQL Server 2008 Performance Data Collector (PDF, 800K)

www.perthsqlserver.com

Perth .NET Users Group

Perth, Australia (October 1, 2009)

Introduction to How to Interpret SQL Server Execution Plans (PDF, 800K)

www.perthdotnet.org

24 Hours of PASS

Virtual Conference (September 1, 2009)

Using SQLDiag.exe to Troubleshoot SQL Server Problems (PDF, 350KB)

www.sqlpass.org

devLINK Technical Conference

Nashville, TN (August 13-15, 2009)

Mastering the SQL Server 2008 Data Collector (PDF, 3 MB)
Getting the Most Out of the SQL Server 2005/2008 Profiler (PDF, 3MB)
Database Maintenance Optimization Strategies for the Database Professional (PDF, 2MB)

www.devlink.net


Read more: http://www.bradmcgehee.com/presentations/#ixzz0ytzWyKXI 
Under Creative Commons License: Attribution

'Brain Trainning > DataBase' 카테고리의 다른 글

MySQL Cluster 구성  (0) 2010.09.20
유지관리 - 흔적삭제  (0) 2010.09.13
유용한 SQL Poster  (0) 2010.08.26
MSSQL Job(작업) 결과 조회 쿼리  (0) 2010.08.25
Backup 용 Script  (0) 2010.08.24
posted by LifeisSimple
2010. 8. 25. 11:51 Brain Trainning/DataBase
Job 결과가 궁금할때 조회하는 쿼리 (수집용)

select job_id, name, step_id, step_name, subsystem, command, database_name,

       last_run_outcome, last_run_date,

       (substring(last_run_time, 1, 2) + ':' + substring(last_run_time, 3, 2) + ':' + substring(last_run_time, 5, 2)) as last_run_time,

       (substring(last_run_duration, 1, 2) + ':' + substring(last_run_duration, 3, 2) + ':' + substring(last_run_duration, 5, 2)) as last_run_duration,

       last_run_retries,

       sMessage

from (

       select a.job_id, name, step_id, step_name, subsystem, command, database_name,

             (case last_run_outcome when 0 then '실패'

                           when 1 then '성공' else '알수없음' end) as last_run_outcome,

             last_run_date,

             right('S000000' + convert(varchar(8), last_run_time), 6) as last_run_time,

             right('S000000' + convert(varchar(8), last_run_duration), 6) as last_run_duration,

             last_run_retries,

             (case when last_run_outcome = 0 then (

                    select top 1 [message]

                                 from msdb.dbo.sysjobhistory

                           where job_id = a.job_id and run_date = b.last_run_date and run_time = b.last_run_time

             ) else '' end) as sMessage

       from msdb.dbo.sysjobs a

             left join msdb.dbo.sysjobsteps b on a.job_id = b.job_id

       where enabled = 1

) as O

order by name, step_id

'Brain Trainning > DataBase' 카테고리의 다른 글

Brad M. McGehee SQL Presentations  (0) 2010.09.08
유용한 SQL Poster  (0) 2010.08.26
Backup 용 Script  (0) 2010.08.24
MBSA Command Line Tool  (0) 2010.08.22
MBSA Offline Scan file  (0) 2010.08.22
posted by LifeisSimple
2010. 8. 19. 20:09 Brain Trainning/DataBase
Understanding How Restore and Recovery of Backups Work in SQL Server
SQL Server 2008 R2

 This topic is relevant for all SQL Server databases.

Restoring is the process of copying data from a backup and applying logged transactions to the data to roll it forward to the target recovery point. A data or differential backup contains sufficient transaction log records to allow rolling forward the active transactions as part of restoring each backup. Each backup also contain sufficient log to roll back uncommitted transactions to bring the database into a state that is transactionally consistent and usable. The process of rolling forward uncommitted transactions, if any, and bringing the database online is known as recovery.

The Roll Forward Set

The process of applying logged changes to data in a database to bring the data forward in time is known as rolling forward. The set of all data restored is called the roll forward set. A roll forward set is defined by restoring one or more full backups, such as a database or partial backup or a set of file backups. If a RESTORE statement specifies filegroups, files, or pages, only these items are included in the roll forward set. Otherwise, all files in the backup being restored are included in the roll forward set. If the full backup contains log records, the restored data will be rolled forward using this log.

NoteNote

If you specify a filegroup during restore, the restore encompasses the whole filegroup as it currently exists. This includes any files added to the filegroup since the backup was taken. For more information, see Controlling Creation of Added Files During Roll Forward.

For differential backups, if any files were added to the database since the differential base, restoring a differential backup might overwrite pages in the roll forward set with data from the differential backup. For more information, see Using Differential Backups.

Restoring a differential backup updates a page only if the page is in the roll forward set, the page is contained in the backup, and the RESTORE statement either lists the page or its file or does not list any files or pages.

Under the full and bulk-logged recovery models, the log must be backed up separately. After you restore data and (optionally) differential backups, you would typically restore the subsequent log backups to bring the database up to the point of failure. Restoring a log backup rolls forward all pages in the roll forward set. For more information about log backups, see Working with Transaction Log Backups.

Restore Sequences

Each restore scenario is implemented by using one or more restore steps (operations), called a restore sequence. Each operation corresponds to an individual Transact-SQL RESTORE statement. A restore sequence moves affected data through one or more of the phases of restore.

For more information about Transact-SQL restore sequences and how to construct them, see Working with Restore Sequences for SQL Server Databases.

The Phases of Restore

A restore is a multiphase process. The possible phases of a restore include the data copy, redo (roll forward), and undo (roll back) phases:

  • The data copy phase involves copying all the data, log, and index pages from the backup media of a database to the database files.

  • The redo phase applies the logged transactions to the data copied from the backup to roll forward that data to the recovery point. At this point, a database typically has uncommitted transactions and is in an unusable state. In that case, an undo phase is required as part of recovering the database.

  • The undo phase, which is the first part of recovery, rolls back any uncommitted transactions and makes the database available to users. After the roll back phase, subsequent backups cannot be restored.

The rest of this section examines these phases in more detail.

Data Copy Phase

The first phase in any restore process is the data copy phase. The data copy phase initializes the contents of the database, files, or pages being restored. This phase is performed by restore database, restore file, and restore page operations using full or differential backups.

The data copy phase involves copying data from one or more full backups and, optionally, differential backups, and then resetting the contents of the affected database, files, or pages to the time that they were captured by those backups.

The oldest file or page in the roll forward set determines the starting point for the next phase: redo (roll forward).

Redo Phase (Roll Forward)

Redo (or roll forward) is the process of redoing logged changes to the data in the roll forward set to bring the data forward in time. To accomplish roll forward, the SQL Server Database Engine processes log backups as they are restored, starting with the log that is contained in full backups,

Restore avoids unnecessary roll forward. Generally, if data was read-only when it was backed up and has remained read-only, roll forward is unnecessary and is skipped.

The Recovery Point

The goal of roll forward is to return the data to its original state at the recovery point. The recovery point is the point to which the user specifies that the set of data be recovered. Under the full recovery model, you can specify the recovery point as a particular point in time, a marked transaction, or a log sequence number. Under the bulk-logged recovery model, you can restore to a point in time only if no bulk operations have been performed since the previous log backup.

Redo Consistency

In the redo phase, data is always rolled forward to a point that is redo consistent with the state of the database at the recovery point. All the data has been rolled forward to a point at which undo can occur.

The state of the database is defined by the primary file, as follows:

  • If the primary file is being restored, the recovery point determines the state of the whole database. For example, if a database is being recovered to a point in time just before a table was accidentally dropped, the whole database must be restored to the same point in time.

  • If the primary file is not being restored, the database state is known and restored data is rolled forward to a recovery point that is transactionally consistent with the database. SQL Server enforces this.

However, the database might contain changes made by transactions that are uncommitted at the recovery point. For online restore, data is recovered to a point in time consistent with the current state of the online part of the database.

A differential backup skips forward to when the differential backup was taken. Pages in the roll forward set are overwritten with any more recent ones from the differential backup.

Undo (Roll Back) Phase and Recovery

After the redo phase has rolled forward all the log transactions, a database typically contains changes made by transactions that are uncommitted at the recovery point. This makes the rolled forward data transactionally inconsistent. The recovery process opens the transaction log to identify uncommitted transactions. Uncommitted transactions are undone by being rolled back, unless they hold locks that prevent other transactions from viewing transactionally inconsistent data. This step, is called the undo (or roll back) phase. If the data is already transactionally consistent at the start of the recovery process, the undo phase is skipped. After the database is transactionally consistent, recovery brings the database online.

After one or more backups have been restored, recovery typically includes both the redo and undo phases. Every full and differential backup contains enough transaction log records to allow for the data in that backup to be recovered to a self-consistent state.

NoteNote

During a crash recovery or a database mirroring failover, SQL Server 2005 Enterprise Edition and later versions let users access the database during the undo phase. This is known as fast recovery. Fast recovery is possible because transactions that were uncommitted when the crash occurred reacquire whatever locks they held before the crash. While these transactions are being rolled back, their locks protect them from interference by users.

Relationship of RECOVERY and NORECOVERY Options to Restore Phases

A specific RESTORE statement either ends after the redo phase or continues through the undo phase, depending on whether the statement specified WITH NORECOVERY, as follows:

  • WITH RECOVERY includes both the redo and undo phases and recovers the database; additional backups cannot be restored. This is the default.

    If the roll forward set has not been rolled forward far enough to be consistent with the database, the undo phase cannot occur. The Database Engine issues an error and recovery stops.

    If the whole roll forward set is consistent with the database, recovery is performed, and the database can be brought online.

  • WITH NORECOVERY omits the undo phase to preserve uncommitted transactions. Omitting the undo phase allows for restoring other backups to roll the database further forward in time. Occasionally, RESTORE WITH NORECOVERY rolls forward data to where it is consistent with the database. In these cases, the Database Engine issues an informational message stating that the roll forward set can now be recovered by using the RECOVERY option.

    For information about roll forward sets, see Understanding How Restore and Recovery of Backups Work in SQL Server.

NoteNote

A third alternative, WITH STANDBY, is outside the scope of this topic.

For an in-depth description of these RESTORE options, see RESTORE (Transact-SQL).

Recovery Paths

recovery path is a unique set of transformations that have evolved the database over time yet maintained its consistency. For information about recovery paths and the related concepts of recovery forks and recovery branches, see Recovery Paths.


출처 : MSDN
posted by LifeisSimple
prev 1 ··· 5 6 7 8 9 next